Please note that for the duration of this tutorial, we'll use Testnet to guarantee a secure learning experience. Your Testnet API key serves as the gateway to this development.
Using Circle's Cross-Chain Transfer Protocol (CCTP) for Enhanced USDC Transfers
Introduction
Circle's Cross-Chain Transfer Protocol (CCTP) facilitates the transfer of USDC between distinct blockchains, providing a more streamlined experience. By integrating CCTP with programmable wallets in your applications, you enable seamless USDC transactions across multiple chains. This reduces the need for users to manage separate wallets for different blockchains, potentially broadening your audience and providing increased liquidity and adaptability. It's designed to provide users with a cohesive and efficient digital currency experience.
Leverage Blockchain-Specific Attributes
Use blockchain-specific characteristics to optimize your user experience. For instance, by bridging your ETH from Ethereum Mainnet to an Ethereum Layer 2 rollup, such as Polygon, you gain access to lower transaction fees while still enjoying the benefits of USDC.
Cross-Chain Swaps
Enable cross-chain swaps, allowing users to exchange digital assets that reside on different chains. For example, users can swap AVAX for USDC on Avalanche, route it to Polygon Mainnet, and further swap it for MATIC token, expanding liquidity across multiple chains.
Cross-Chain Purchases
Facilitate cross-chain purchases with minimal effort. Users can utilize USDC on Avalanche to buy an NFT on Uniswap on Ethereum, then list it for sale on OpenSea. CCTP effortlessly routes the USDC from Avalanche to Ethereum for the purchase.
Solve Fragmented Liquidity
Remove liquidity fragmentation barriers. If a user needs to send USDC to an address on Avalanche but only holds USDC on Ethereum, the solution becomes seamless. By bridging the USDC from Ethereum to Avalanche through CCTP, users can transact across different blockchains.
Outcomes of this Interactive Quickstart Guide
By the conclusion of this interactive guide, you will learn how to facilitate a transfer of USDC across blockchains using a Programmable Wallet. Specifically, the guide will demonstrate a scenario wherein a user conducts a USDC transfer leveraging the Cross-Chain Transfer Protocol (CCTP). You will follow step-by-step instructions to create and execute a USDC transfer from Sepolia, an Ethereum testnet, to Mumbai, the Polygon Testnet, via a programmable wallet. This practical walkthrough is designed to equip you with the knowledge to implement CCTP in your own applications.
Completing a Cross-Blockchain Transfer: Step-By-Step Process
- 1
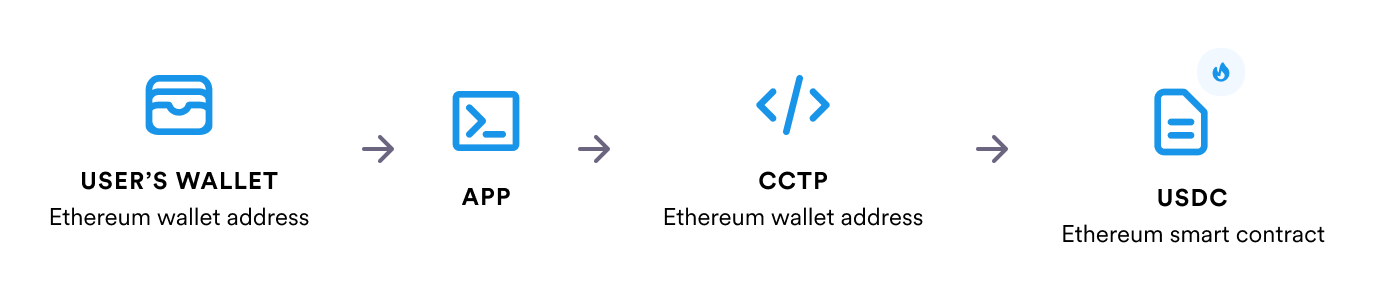
Approve USDC Contract to Initiate Transfers
To utilize CCTP effectively, it's necessary to authorize the USDC contract to conduct transfers on a user's behalf. In this guide, we approve only a small amount of USDC for demonstration. However, for operational efficiency, you might want to approve a larger amount to minimize the frequency of this action in a production environment.
- 2
Initiate the Burning of USDC
Following the user's request to move USDC from Ethereum to Polygon, leverage the provided tools to initiate burning the specified amount of USDC from the Ethereum wallet created for this transaction.
- 3
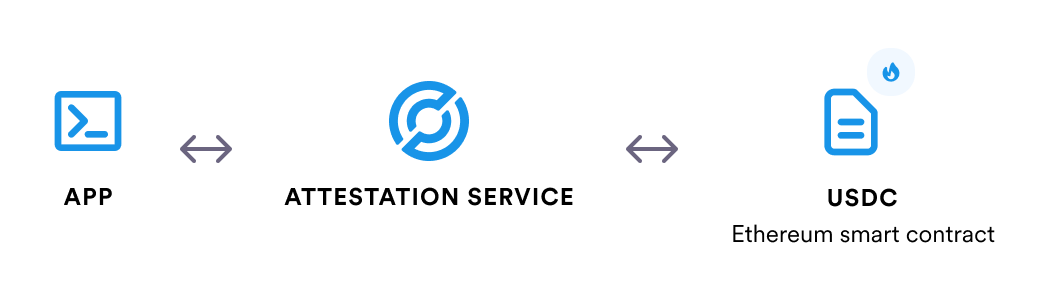
Obtain Circle’s Attestation
Circle monitors the burn event on the Ethereum blockchain and issues an attestation. Retrieve this attestation using the relevant procedures, which serves as the authorization required to mint the corresponding USDC amount on the Polygon blockchain.
- 4
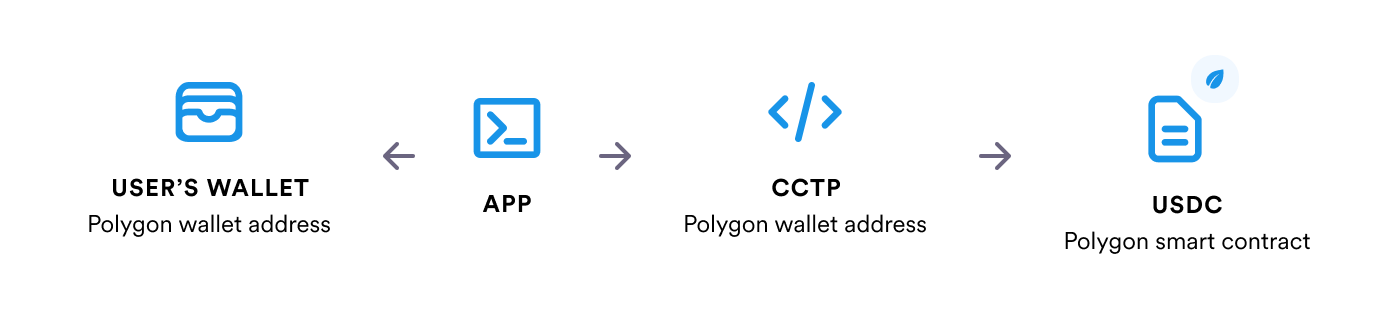
Trigger USDC Minting
Utilize the retrieved attestation to start the minting process. The attestation confirms the amount of USDC to mint on the Polygon blockchain, and the amount to allocate to the specified Polygon wallet.
Understanding Smart Contracts
Smart contracts are computer protocols that automate the execution of agreements, operating under a set of predefined conditions. Once deployed onto a blockchain, they follow an "if-then" logic to perform actions automatically when specific conditions are met. The immutable nature of blockchain ensures that the smart contract code cannot be changed once established, which reinforces their reliability as they will always execute exactly as programmed. A smart contract typically consists of code that defines its operations, a data storage area, memory, and a unique public address that can be interacted with through its functions. For a comprehensive exploration of smart contracts, you are encouraged to read further on the dedicated resource.
Exploring the Cross-Chain Transfer Protocol (CCTP)
The Cross-Chain Transfer Protocol (CCTP) serves as an integral tool within the blockchain infrastructure to guarantee the secure and seamless transfer of USDC across various blockchain networks. By adopting CCTP, users can benefit from a protected and efficient means of transferring USDC between supported chains, which currently include Ethereum, Arbitrum, Optimism, and Avalanche. Ongoing developments suggest plans to expand support to additional networks. To learn more about CCTP, see Cross-Chain Transfer Protocol in the Circle Developer Documentation.
To get started, Create a Circle Web3 Services account in the console.
Step 1: Setting Up Your Testnet API key
Ready to begin?
A Circle Web3 Services API Key identifies who submits API requests. Circle uses the API Key to authenticate your requests, so only you can interact with Circle using your key. To create an API Key, you first need a Circle Web3 Services account. If you didn't create one yet, use the following link to sign up with your email address. The account is free to use for testing.
Understanding Testnet versus Mainnet Environments
Before you proceed, it's critical to differentiate two fundamental environments in blockchain development: Testnet and Mainnet.
Testnet is akin to a training ground for developers. It's a simulated environment where you can develop, test, and polish your applications with confidence. In this space, you can execute transactions and test various scenarios without any financial implications, as Testnet does not involve real cryptocurrencies or assets.
In contrast, Mainnet is where everything goes live. This network handles actual transactions with genuine digital currencies. Operating on Mainnet means dealing with real-world consequences and genuine assets. The results of actions performed here are immediate and impactful.
While it may seem exciting to leap directly into Mainnet, it is crucial to rigorously test and validate your applications within the Testnet environment first. This precaution ensures that all systems and functionalities operate correctly before you transition to a live environment where stakes are higher. Once you have a thoroughly vetted application in Testnet, you can smoothly migrate to Mainnet operations.
Creating your API key
To proceed with this guide, create a standard API key. Here's how to generate it:
- 1
Log in to the console
First, log in to the Circle Web3 Services console.
- 2
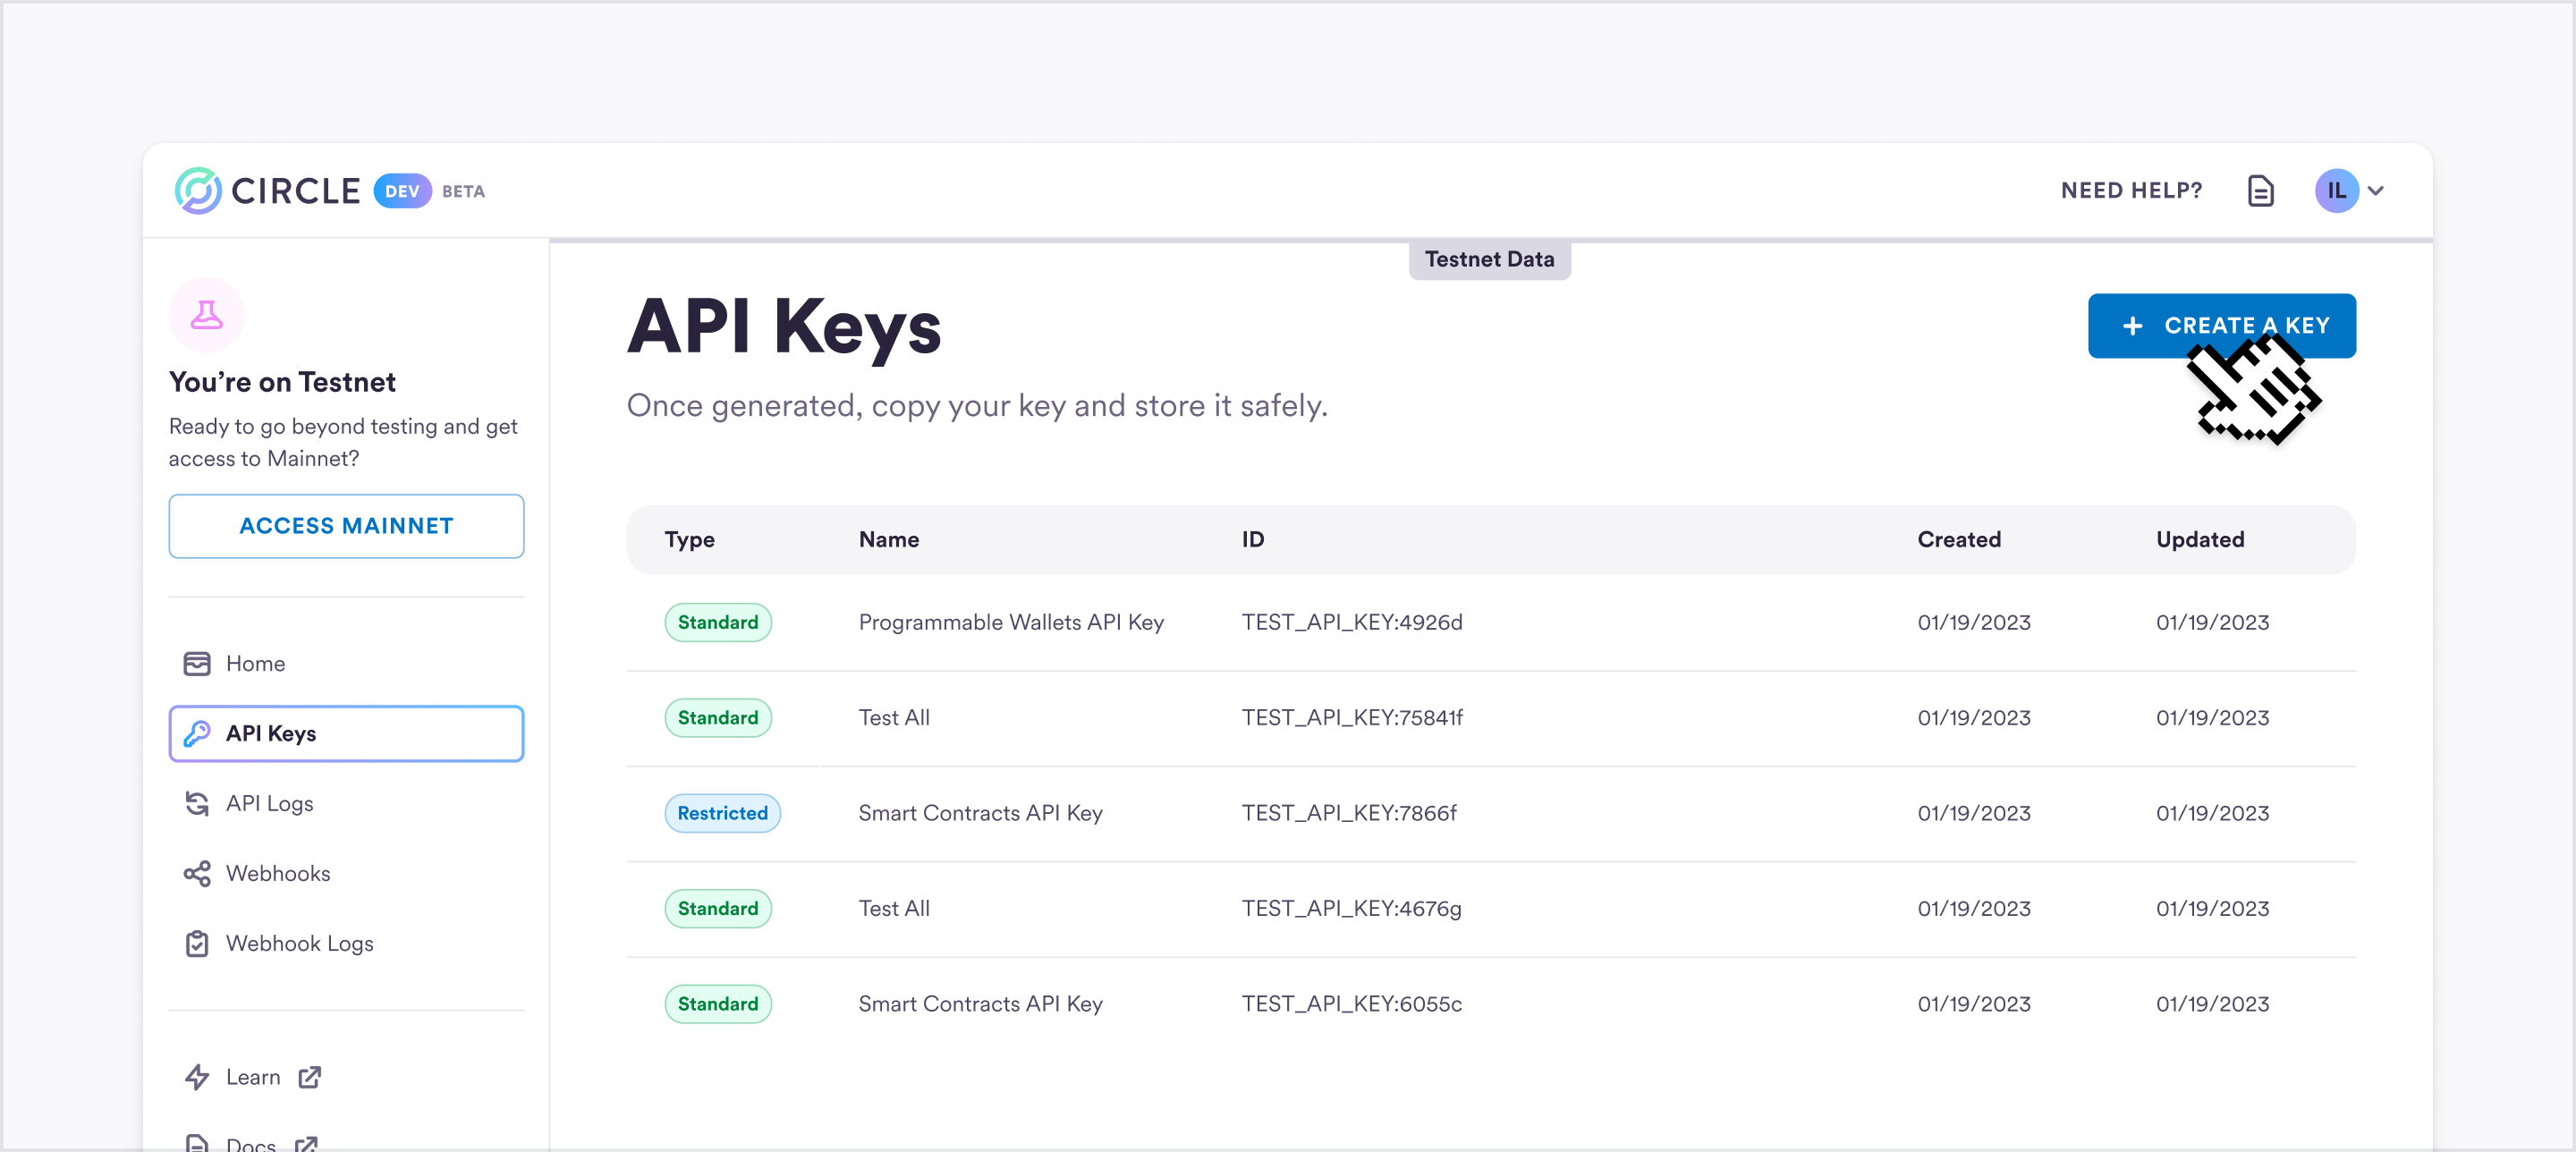
Open the API keys page
After you log in, open the API Keys page, and then click CREATE A KEY.
- 3
Set Up your new API key
Provide a Key Name for your new API key, and then select Standard Key.

- 4
Copy and Store safely
The console displays your key only once after you create it. Make sure to copy the key value and store it in a secure location. You can't retrieve the key value after you close the dialog. If you lose the value, you need to create another key. Never share your key with anyone.

The power of Testnet
Now that you have a Testnet API Key, you can:
Test With Assurance
Engage in robust testing of your applications, smart contracts, and other blockchain innovations, all within a safe environment that simulates real-world operations. This sandbox allows for trial and error without any financial stakes, so mistakes carry no monetary risk.
Achieve Broad Compatibility
Testnet serves as a preparatory platform for launches on various blockchains. Whether your focus is on Ethereum, Polygon, or Avalanche, Testnet provides insights into how your applications will perform across different ecosystems.
Encourage Innovation
The Testnet environment is the perfect place to brainstorm and develop new blockchain solutions. Here, you have the license to push boundaries and explore various possibilities without financial constraints.
Iterate Swiftly
Benefit from the ability to quickly refine your projects based on immediate feedback and test insights. The adaptable nature of Testnet supports rapid prototyping and swift iteration, which can lead to faster advancements and better outcomes in your development cycle.
Step 2: Understanding the Entity Secret in Developer-Controlled Wallets
The Entity Secret is an integral component in Developer-Controlled Wallets, serving as a key element in bolstering security.
What is the Entity Secret?
The Entity Secret is a robust 32-byte key engineered to enhance the security mechanisms of Developer Controlled Wallets. Its value lies not only in its complexity but also in the specific security benefits it confers.
The importance of the Entity Secret
Exclusivity
The Entity Secret is generated by you and remains known exclusively to you. Consider it as your private password or a cryptographic signature that distinguishes your activities.
Enhanced Security for Critical API Requests
For critical actions such as wallet creation or initiating transactions, the Entity Secret comes into play. Attaching an encrypted version of the Entity Secret to these API requests provides an added authentication factor, reinforcing the security infrastructure.
Dynamic Protection
With a requirement to re-encrypt the Entity Secret for each API request, you avoid the risks associated with having a static key, which could be vulnerable to security breaches. This dynamic approach means that every request is identifiably distinct, providing fortified protection against potential attacks.
Sole Authority
While our platform enables operations using the Entity Secret, it does not store it. This design choice comes with dual implications: First, it ensures you are the sole entity capable of using your private keys, thus preserving absolute control over them. Second, it places the responsibility squarely on your shoulders to secure the Entity Secret conscientiously, as its security is paramount to the overall protection of your Developer-Controlled Wallets.
Balancing Power with Responsibility as a Developer
The Entity Secret embodies the level of trust and authority that our platform confers upon developers. It enables smooth access to the extensive capabilities of developer-controlled wallets, while simultaneously ensuring their security is maintained. However, great power necessitates equally great responsibility. The safeguarding, encryption, and periodic renewal of the Entity Secret are duties that rest with you, the developer.
This dynamic of empowering developers while also entrusting them with critical security tasks reflects the core principles of decentralization intrinsic to the web3 ecosystem. As a developer, you're more than a creator; you assume the role of a guardian of security and a proponent of distributed authority.
Generating the Entity Secret
const crypto = require('crypto')
const secret = crypto.randomBytes(32).toString('hex')

console.log(secret)
Generate your own Entity Secret
Step 3: Transforming Your Entity Secret into Ciphertext and Initiating Registration
With your Entity Secret now created, we're ready to advance to a critical juncture. You're about to convert the Entity Secret into Ciphertext and register it with the system. This process sets the stage for you to create your first wallet—a milestone to look forward to.
Retrieving Your Entity's Public Key
Begin by acquiring your entity's public key. This key is retrievable via our APIs and is instrumental in the upcoming steps. To obtain it, use your API key for authentication. The entity's public key plays a crucial role as it encrypts your Entity Secret. Once encrypted, the Entity Secret remains secure, ensuring the information is shared exclusively between you and the platform, keeping it out of reach from outsiders.
Fetching your public key
Encrypting the Entity Secret and Encoding in Base64 Format
After obtaining the public key, the next step involves using RSA encryption to secure your Entity Secret. Follow these steps:
- 1
Encrypt the Entity Secret
Employ RSA encryption with the public key to encrypt your Entity Secret. This cryptographic process ensures that the secret is encoded in such a way that only someone with the private key can decrypt it.
- 2
Encode as Base64
After encryption, convert the encrypted data into Base64 format. Encoding in Base64 ensures the encrypted data can be safely conveyed and interpreted in various contexts, including those that may not handle binary data well.
- 3
Verify the Ciphertext Length
Ensure that the generated Ciphertext is 684 characters in length. This specific length confirms the encryption process has been executed properly and that the data will be maintained correctly upon receipt.
The code provided will assist in automating this encryption process, generating a unique Entity Secret Ciphertext every time it is executed. The resulting Ciphertext is what you'll use to interact securely with the platform's API when performing operations that require it.
Encrypt your Entity Secret
const forge = require('node-forge')

const entitySecret = forge.util.hexToBytes('YOUR_ENTITY_SECRET');

const publicKey = forge.pki.publicKeyFromPem('YOUR_PUBLIC_KEY');

const encryptedData = publicKey.encrypt(entitySecret, 'RSA-OAEP', { md: forge.md.sha256.create(), mgf1: { md: forge.md.sha256.create(), }, });

console.log(forge.util.encode64(encryptedData)) Generate Entity Secet Ciphertext
Registering Your Entity Secret Ciphertext
Once you've taken the necessary steps to safeguard your Entity Secret by converting it to Ciphertext, you'll need to register it within our Web3 Services Console. This action is vital as it authenticates the Ciphertext, effectively setting up a secure foundation for all subsequent interactions using our Developer-Controlled Wallets. The registration links your encrypted key with your developer account, ensuring that you can confidently manage wallet creation and transactions with the assurance of robust security measures in place.
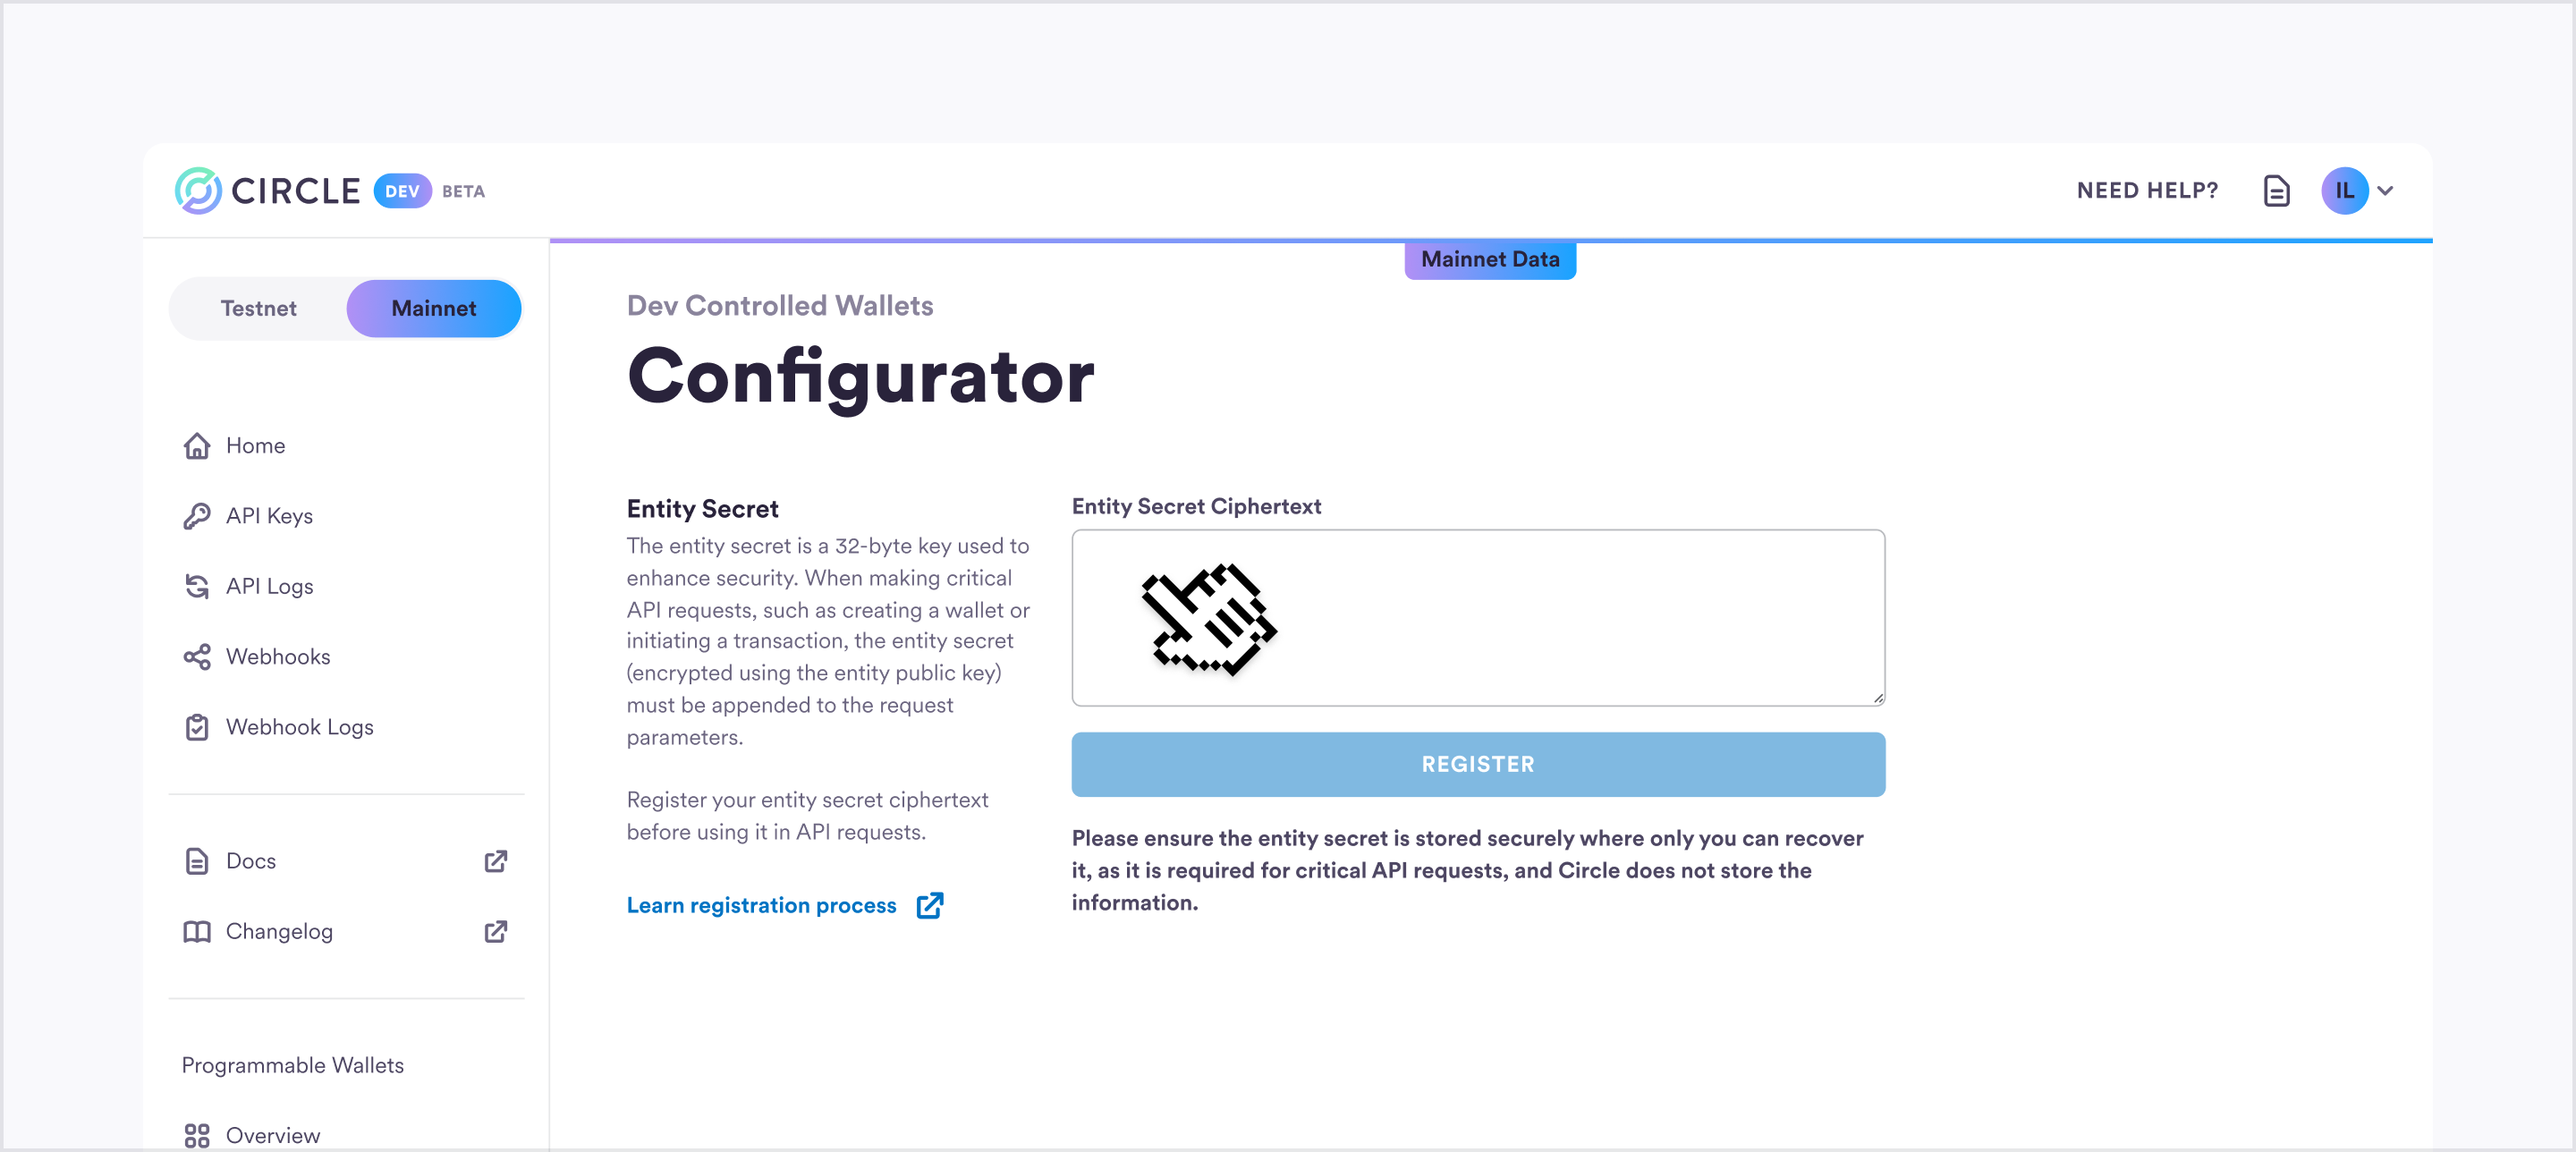
Register your Entity Secret Ciphertext
As you proceed with the registration of your Entity Secret Ciphertext, pay close attention to the recovery file that will be generated. This file is a critical safety measure for your operations. In the event that your Entity Secret is ever lost, the recovery file will act as your fallback, enabling you to regain access to your Developer-Controlled Wallets. Ensure that you store this file securely and in a location that you can access readily if needed.
Guarding your secrets & building trust
By meticulously completing the registration and protection of your Entity Secret, you've not only guaranteed the security of your key but also laid down a bedrock of trust for all activities involving our developer-controlled wallets. We prioritize the safety of your data and are committed to providing a seamless and secure user experience.
Step 4: Introduction to Making an API Call - WalletSet Creation
Welcome to a foundational step in utilizing our Web3 Services: initiating your first API call to construct a WalletSet. We'll guide you through the process and clarify what a WalletSet entails within our platform.
Defining a WalletSet
A WalletSet within our ecosystem is a sophisticated grouping of wallets, securely tied together by a singular cryptographic key. Leveraging the Hierarchical Deterministic (HD) wallet technology, WalletSets offer an enhanced way to handle wallet management that spans multiple blockchain networks. This is particularly relevant for Ethereum Virtual Machine (EVM) compatible blockchains, where it is common for wallets on different networks to share the same address, thanks to the underlying technology.
Grasping the concept of idempotency
As we approach the creation of your inaugural WalletSet, it's important to comprehend a critical aspect of our APIs: idempotency keys.
Idempotency is a fundamental concept which guarantees that an operation is repeatable without changing the outcome. This concept is extremely important in API requests to make sure that if a request is accidentally sent more than once, it doesn't result in duplicate operations.
Consider situations like an unstable internet connection leading to multiple unintentional request submissions, or a user who accidentally activates a command several times. Without idempotency, such events might cause numerous unwanted operations.
To prevent this, an idempotency key is used. Each request includes a distinct key that, when recognized by the server within a certain timeframe as a repeat submission, prevents the repeated processing of that request. This mechanism is crucial to preserving the integrity of your operations, ensuring that only intended actions are carried out.
Crafting Your WalletSet
Now that we've got the concept of idempotency covered, let's look at creating your WalletSet.
| Term | Definition |
|---|---|
| idempotencyKey | Think of this as a safety net. By using a unique UUID for every transaction request, you ensure no transaction is mistakenly processed more than once. It's a measure against unintended duplicates. |
| entitySecretCiphertext | Remember the encryption we discussed earlier? You'll need to provide this encrypted string for security and authorization. |
| name | The name for your new WalletSet. |
Let's create our first wallet set!
Create a WalletSet
Utilizing API Logs for Enhanced Monitoring
For a comprehensive overview of each transaction you execute with Circle's Web3 APIs, the Web3 Services Console provides detailed access to API logs. By examining these logs, you gain valuable visibility into how your application interacts with Circle APIs, which can be pivotal for various aspects including troubleshooting, performance optimization, and security oversight by highlighting any abnormal activities. For detailed records of your API interactions, please refer to the API Logs section.
Within the scope of our Quickstart guide, the API log is indispensable for gaining insights into specific API calls and the objects that are created as a result. Think of the API log as a detailed record that allows you to retrieve the unique IDs of objects that have been generated, especially when these IDs are needed for subsequent API interactions. API logs are a crucial educational resource that simplify the debugging process and help you methodically comprehend the intricacies of the API's operations. Hence, the API log is not only instrumental in improving operational workflows but also serves as a valuable asset for your development projects.
Step 5: Initiating Developer-Controlled Wallet Creation
We have reached an exciting milestone: setting up your initial developer-controlled wallet within the web3 realm. Now that you have your API key and Entity Secret Ciphertext, we're positioned to begin the creation process. Let's proceed with the details.
The Developer-Controlled Wallet Explained
In the context of web3, a wallet extends beyond a mere repository for digital assets such as tokens or NFTs. It represents the core conduit for interacting on the blockchain network. Essentially, a wallet is defined by a distinct address with associated metadata recorded on the blockchain.
For your developer-controlled wallets:
Address
An address functions as a distinct identifier within a blockchain ecosystem. It's important to note that while an address is unique, it can be consistent across various EVM-compatible blockchains, allowing multiple wallets to share the same address.
Custody Type
This aspect indicates the entity responsible for the management of private keys—either the end user or the developer. In our context, we're examining developer-controlled wallets, which offer enhanced manageability and can be customized to align with the particular demands of your application.
With that foundational knowledge, let's get to the hands-on part.
Crafting your wallet
To create a wallet you need the following parameters:
| Term | Definition |
|---|---|
| idempotencyKey | Ensures that a request is only executed once, even if it's received multiple times. |
| entitySecretCiphertext | The encrypted form of your Entity Secret, ensuring robust security for your API requests. |
| walletSetId | The ID of the wallet set that you've created in the last step. |
| blockchains | Specifies on which blockchains the wallet should be manifested. |
| count | The number of wallets you aim to create. Note: The value should not exceed 20. |
We simplified the wallet creation process within the following "Try it out" component. This component enables you to create wallets on the Ethereum and Polygon testnet networks seamlessly, setting the stage for the subsequent steps of this guide.
Create required wallets
And there you have it! By the end of this step, you created fully functional developer-controlled wallets, and a ready to shape the web3 experience for your users.
Step 6: Approve the TokenMessenger contract for Ethereum
In the process of transferring USDC from Ethereum to Polygon, you need to give the TokenMessenger contract the necessary permissions to execute the USDC transfer on your behalf. In essence, you're empowering the TokenMessenger contract to access and transfer the specified amount of USDC from your source wallet.
For this, we use the Programmable Wallets contract execution API:
| Term | Definition |
|---|---|
| contractAddress | You interact with the USDC contract on the source chain, so the |
| abiFunctionSignature | The function called on the USDC contract is approve(address spender, uint256 value). Calling approve allows the value is denominated in the smallest unit of USDC, which is a millionth of a dollar. In this case it's |
| abiParameters | In this case, In this case it's |
| walletId | The wallet that performs the contract execution. This is the ID of the developer-controlled wallet you created earlier. |
| feeLevel | A dynamic blockchain fee level setting (LOW, MEDIUM, or HIGH) that will be used to pay gas for the transaction. HIGH is used for this transaction. |
| idempotencyKey | Universally unique identifier (UUID v4) idempotency key. This is automatically generated for you. |
| entitySecretCiphertext | A base64 string expression of the entity secret ciphertext. Refer to this helpful tool. |
Approve USDC Sepolia from source wallet
Step 7: Burn USDC on Ethereum
The second step of the process facilitates a burn of the specified amount of USDC on Ethereum Sepolia (the source chain) that you are looking to move to Polygon Mumbai (the destination chain).
To do this, you again use Programmable Wallets contract execution API:
| Term | Definition |
|---|---|
| contractAddress | You interact with the Token Messenger contract on the source chain, so the |
| abiFunctionSignature | The function being called on the TokenMessenger contract is: This will be the abiFunctionSignature property of the request. In this case it's depositForBurn(uint256,uint32,bytes32,address) |
| abiParameters | The abiParameters property defines the values to pass to the function. For the call to depositForBurn, they are amount, destinationDomain, mintRecipient and burnToken.
Code Therefore, the complete abiParameters value is [1000000, 7, {encodedDestinationAddress}, “0x1c7D4B196Cb0C7B01d743Fbc6116a902379C7238”]. |
| walletId | The wallet that is performing the contract execution. This will be the ID of the developer-controlled wallet you created earlier. |
| feeLevel | A dynamic blockchain fee level setting (LOW, MEDIUM, or HIGH) that will be used to pay gas for the transaction. HIGH is used for this transaction. |
| idempotencyKey | Universally unique identifier (UUID v4) idempotency key. This is automatically generated for you. |
| entitySecretCiphertext | A base64 string expression of the entity secret ciphertext. Refer to this helpful tool. |
Just like your first contract execution request, the other parameters - walletId, feeLevel, idempotencyKey, and EntitySecretCiphertext - were automatically populated in the request.
Deposit for Burn on Ethereum
Validating the Burn of 1 USDC in your Developer Console
After initiating the burn of USDC through our API, you can check whether it was successful in our Developer Console.
- 1
Login to the Web3 Services Console
To begin the process of validating your burn of USDC, log in to the Web3 Services Console.
- 2
Navigate to the List of Wallets
Within the console, locate the Wallets page under Dev Controlled Wallet. This page displays all of the wallets you created thus far. Open the
Wallets page
.
- 3
Open the Wallet Details Screen
Find and click on the Ethereum Sepolia wallet from which you initiated the USDC burn.
- 4
View Your Wallet Balance
On the wallet details screen, scroll down to the bottom to find the section displaying your wallet balances. As you successfully created your Sepolia Wallet, an initial deposit of 10 USDC was made. If you have successfully burned 1 USDC, the total wallet balance should now reflect 9 USDC, indicating the accurate deduction of the burned amount.

By following these step-by-step instructions and reviewing your wallet balance in the Web3 Services Console, you can confidently validate the burn of your USDC tokens and verify the correct adjustment in your wallet's overall balance.
Step 8: Get Attestation from Circle
As a result of interacting with the TokenMessenger contract, Circle generates a unique ID for the transaction. Starting with the returned transaction ID, you call Circle's Attestation service to fetch an attestation that the burn took place. This attestation proves that the USDC was removed from circulation on the source chain.
The attestation is used on the destination chain to mint new USDC. You can make API calls to get the transaction's transactionHash, retrieve the logs of the depositForBurn transaction, and use Circle's Attestation API to fetch the attestation signature. The steps have been broken down for you here, but you can use the following "Try It Out" component to run all of these steps together.
- 1
Fetching the Deposit Transaction Object from Programmable Wallets.
Call the Programmable Wallets API to fetch the transaction object for the
depositForBurntransaction. Make a GET request using the provided code and the transaction ID. Retrieve the transaction object from the response data.Code - 2
Decoding and Creating messageBytes and messageHash with a Web3 Library
Using a Web3 library like web3 or ethers, decode and create
messageBytesandmessageHashfrom the transaction object'stxHash. Follow the provided code snippet to extract the relevant information.Code1// get messageBytes from EVM logs using txHash of the transaction. 2const transactionReceipt = await web3.eth.getTransactionReceipt( 3 transaction.txHash, 4) 5const eventTopic = web3.utils.keccak256('MessageSent(bytes)') 6const log = transactionReceipt.logs.find((l) => l.topics[0] === eventTopic) 7const messageBytes = web3.eth.abi.decodeParameters(['bytes'], log.data)[0] 8const messageHash = web3.utils.keccak256(messageBytes) 9 - 3
Fetch Attestation Signature from Circle's Iris API
Retrieve the attestation signature from Circle's Iris API using the
messageHashobtained in the previous step. Use the provided code inside a loop to query the API until the attestation status is "complete". Access the attestation signature from the response.Code1// Get attestation signature from iris-api.circle.com 2let attestationResponse = { status: 'pending' } 3while (attestationResponse.status != 'complete') { 4 const response = await fetch( 5 `https://iris-api-sandbox.circle.com/attestations/${messageHash}`, 6 ) 7 attestationResponse = await response.json() 8 await new Promise((r) => setTimeout(r, 2000)) 9} 10
Fetch Attestation
Step 9: Mint USDC on Polygon
To mint USDC on the destination blockchain, we're using the messageBytes from the depositForBurn event and the attestation signature (attestationResponse.attestation). We're fetching both from Circle's attestation services and calling the receiveMessage function on the Message Transmitter contract in the destination blockchain network.
Using the Programmable Wallets smart contract execution API:
| Term | Definition |
|---|---|
| contractAddress | You interact with the Message Transmitter contract on the destination chain, so the |
| abiFunctionSignature | The function being called on the Message Transmitter contract is: This is the |
| abiParameters | For the call to receiveMessage, the abiParameters are
|
| walletId | The wallet that is performing the contract execution. This will be the ID of the developer-controlled wallet you created earlier. |
| feeLevel | A dynamic blockchain fee level setting (LOW, MEDIUM, or HIGH) that will be used to pay gas for the transaction. HIGH is used for this transaction. |
| idempotencyKey | Universally unique identifier (UUID v4) idempotency key. This is automatically generated for you. |
| entitySecretCiphertext | A base64 string expression of the entity secret ciphertext. Refer to this helpful tool. |
Once the message has been received, the specified amount of USDC is minted at the recipient's address on the destination blockchain.
Mint on Polygon
This returns a transactionId after you submit the receiveMessage request. You can use this transactionId to look up the status and details of the final transaction.
Check transaction
Step 10: Congratulations on Your Progress!
First and foremost, thank you for embarking on this journey with us.
Throughout this process, you've successfully:
Set up a Developer-Controlled Wallet
You successfully established a developer-controlled wallet using the Programmable Wallet system. This wallet gives you full control and flexibility over your users' wallets, ensuring a secure and frictionless experience.
Interacted with USDC and CCTP Contracts
Using your newly created wallet, you seamlessly interacted with the USDC and CCTP contracts. This enabled you to initiate and monitor USDC transfers, ensuring transparency and control over the process.
Completed USDC Mint on Mumbai
To finalize the USDC minting process on the Mumbai testnet, you called Circle's attestation service. This step ensures the successful creation and verification of USDC tokens on Matic.
Stay connected & Explore more
Your journey with us doesn't stop here. There's so much more to discover und dive into:
Explore our Expanding Web3 Ecosystem
As our ecosystem flourishes, we're continuously rolling out new tools and platforms. Don't miss out on exploring these complementary products that could significantly enhance your web3 projects.
Engage, Build, Share! Dive into our forums, share your feedback, and keep an eye out for exciting challenges and hackathons. Your unique perspective and skills are valuable, and we're eager to see the innovations you'll introduce to our growing ecosystem.
Your feedback matters
Before you embark further on your journey, we'd love to hear from you. Your feedback shapes the future of our platform and helps us provide a better experience for all developers.
What did you love about the process? Was there something you wish was different? Every insight, no matter how small, matters to us.
Thank you for your trust, dedication, and enthusiasm. Here's to the next chapter in your web3 journey and the marvelous innovations you'll bring forth.
Happy Building! 🚀
© 2023-2024 Circle Technology Services, LLC. All rights reserved.